Trying to figure out how to move your website to a new hosting provider? There’s the right way and then the many wrong ways that can lead to lost data, functionality problems, or drawn-out downtime.
Having collectively managed these site migrations for decades, we’ve seen all the common issues for new clients and those managing their own sites. Let’s walk through the right way.
Signs It's Time to Switch Hosting
Maybe you’ve compressed images as much as you can and pages still load slowly. Or you’re tired of waiting three days for support help. It’s time to reconsider where you’re hosting your website if:
- Your site is slow despite optimization
- Support takes forever to respond
- You’re outgrowing your current setup
- Security features are lacking
- You’re paying for features you don’t use
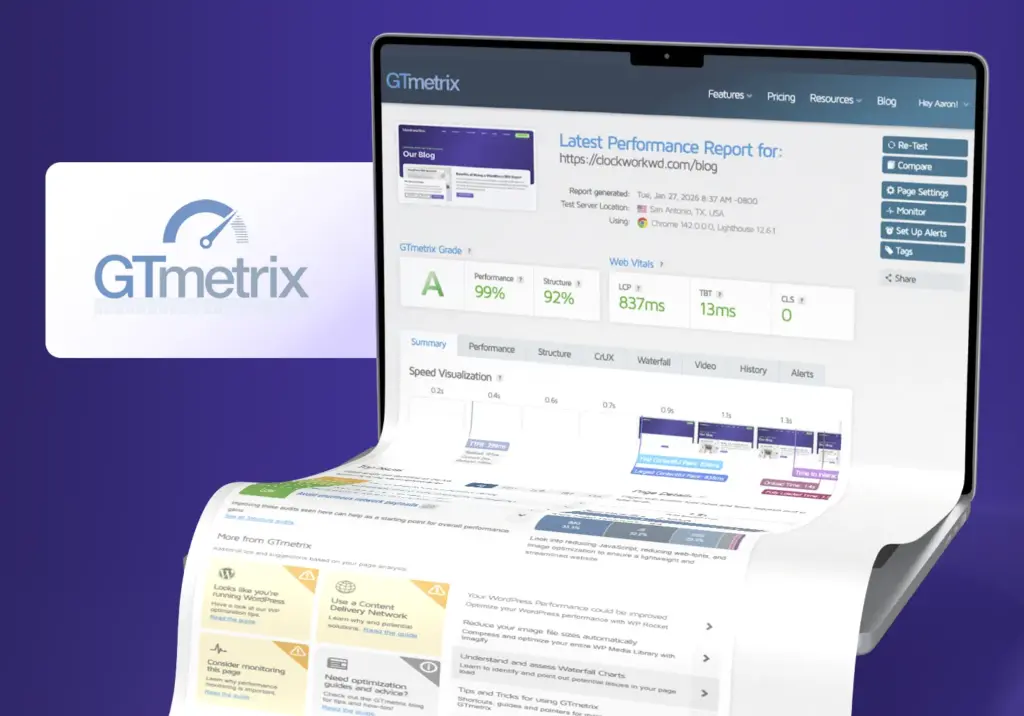
If you’re not sure if hosting is the problem, run a quick test with GTmetrix to check server response time. Slow response means hosting is the likely culprit. Fast response with slow pages tends to mean plugin errors, theme bugs, or other issues that could follow you to the new host.
A Note on Migration Plugins
Plugins like All-in-One WP Migration or Duplicator can automate parts of this process. They work well for simple sites, but often fail with large databases, server upload limits, or unique configurations. They can save time for simple sites, but make sure you have manual backups.
How to Move Your Website to A New Hosting Provider
Moving hosts doesn’t mean changing your domain. You’re just moving where it points, like keeping your phone number when you move. If you’re rebranding your domain from oldsite.com to newsite.com, that’s a different process with 301 redirects and SEO considerations.
In this case, we move client sites in stages: preparation, transferring, and going live. While the migration plugins I mentioned offer one-click solutions, we’re covering manual migration because it works better for larger sites (what our clients generally need).
Phase 1: Prepare
1a. Document Your Current Setup
Before you start actually migrating anything, make sure you have all this information:
- Where your domain is registered
- Your current DNS settings (Zone file)
- SSL certificate configuration
 1")
Helpful Terminology
You don’t need to be a developer to migrate a website, but it helps to understand:
- Domain registrar is where you register your domain name (yoursitename.com). You “rent” the name from companies like Cloudflare, GoDaddy or Namecheap.
Every website needs this. - Hosting provider is where your actual website files live. Big-name providers like WP Engine or Bluehost handle thousands of sites worldwide, while Atlanta website hosting providers like us (serving US clients from coast to coast) offer more hands-on support.
- DNS (Domain Name System) connects your domain name to your hosting provider’s servers, like an address book for the internet. When someone types your domain, DNS tells their browser where to find your site. Where to find your DNS.
- SSL certificate is what makes your site load with HTTPS (the padlock in the browser). Technically optional, but browsers now warn visitors if your site doesn’t have one, so it’s effectively required. Where to find your SSL certificate.
1b. Choose Your New Hosting Provider
Now that you understand your current setup, you can choose hosting that matches your needs. The $5/month shared hosting might work for a personal blog, but not all shared hosting is created equal. Budget options often overcrowd servers and don’t provide very good support.
Look for hosting providers offering:
- Solid uptime track record (99%+ minimum)
- Responsive support when you actually need help
- Automated daily backups with retention of 30+ days
- Free SSL certificates
- Scalable resources as your site grows
Our website hosting and maintenance plans check all the boxes. And migration is free for all clients. We’ve also built rock-solid infrastructure on DigitalOcean, where our hosting plans use partitioned servers for better security and performance.
Once you’ve chosen your hosting provider and plan, sign up and save your login credentials. You’ll need access to your new hosting account in Step 1d.
1c. Back Up (and Export) Your Data
- Website files – Your complete site folder including your theme files, plugin files, media uploads (images, PDFs, videos), and WordPress core files.
- Database – Your content, settings, and configurations live in your database. Export this through phpMyAdmin or your hosting control panel. You’ll import this file on your new host later.
Where Are These Files?
If you’re on WordPress and new to accessing your server files, WordPress.org has a helpful lesson on file structure that shows you exactly where to find everything mentioned here.
1d. Set Up Your New Hosting Environment
Log into your new hosting account (using the credentials from Step 1b) and create the database where your content will live. Just like you documented your old hosting details in Step 1a, you’ll write down these new credentials. They’re what connects your site to its new home.
If using cPanel (common with shared hosting):
- Navigate to “MySQL Databases”
- Create a database name (example: yoursite_db)
- Create a database user and password
- Save these credentials in a password manager like Bitwarden or 1Password – you’ll need them in Step 2c
- Note your database host address (often localhost but sometimes mysql.example.com or a specific server address. Check with your host)
If using a custom dashboard (WP Engine, Kinsta, Flywheel):
- The interface looks different, but you’re doing the same thing
- Follow your provider’s guidance for creating a database
- Premium hosts typically handle the host address automatically
Make sure your new host’s PHP and MySQL versions match (or are newer than) your current setup. You can check this under “Server Information” in both hosting panels. Mismatched versions will cause plugin conflicts.
Keep your domain pointing to the old host for now. You’ll switch DNS after testing everything on the new server.
Phase 2: Migrate
With your documents and backups secured, you can start the actual transfer process. Your old site stays completely live during this entire phase. You’re building a copy on the new server that visitors won’t see yet so they’ll keep accessing your old site until you switch DNS later.
2a. Upload Your Website Files
Upload your backed-up files to the new server. You can do this through your control panel’s File Manager, or you can use a standalone FTP client like FileZilla.
For WordPress sites, pay attention to:
- Correct directory structure (everything goes in public_html or www)
- Proper file permissions (644 for files, 755 for folders typically)
- .htaccess file inclusion for WordPress permalinks depending on the type of website server you are moving to. NGINX servers do not use .htaccess files, for example.
This can take a few minutes to several hours depending on your site size and connection speed. Large media libraries take the longest.
Watch for Broken Images
Don’t move on until you verify all files uploaded. Large media libraries sometimes time out. Compare file counts and total size on your new server against your backup. Missing files now mean broken images later.
2b. Import Your Database
Time to import that database file you backed up in Step 1c. You’ll find phpMyAdmin in your hosting control panel (usually under “Databases”).
The import process:
- Log into phpMyAdmin on your new host
- Select your new database
- Click “Import”
- Upload your SQL file
- Wait for it to complete
If the import fails, it’s usually because your SQL file is too large for phpMyAdmin’s upload limit. Your hosting provider can increase these limits, or you’ll need to split your database file.
That’s it.
Your database is now on the new server with all the correct URLs already in place.
Changing Your Domain?
2c. Update Your Configuration
Your site now needs to connect to the new database. For WordPress, you manually edit wp-config.php and update it with those database credentials you noted earlier in Step 1d:
define('DB_NAME', 'new_database_name');
define('DB_USER', 'new_database_user');
define('DB_PASSWORD', 'new_database_password');
define('DB_HOST', 'localhost'); // Check Step 1d - might be mysql.example.com
For testing with a temporary URL:
You need to test before pointing DNS. Ask your hosting support for your specific temporary URL, and add these lines to temporarily use your host’s testing URL:
define('WP_HOME', 'http://your-temp-url.com');
define('WP_SITEURL', 'http://your-temp-url.com');
You’ll remove these lines once you point your actual domain to the new host. This is the #1 reason sites break during migration. If you see “Error establishing a database connection,” credentials don’t match. Double-check them against what your host provided in Step 1d. One typo can break everything.
2d. Generate Your SSL Certificate
2e. Test Before Going Live
Your site now exists on the new server, but your domain still points to the old host. That’s intentional – you need to test the new version first without affecting live visitors.
Get your temporary URL: Most hosts provide one automatically (looks like temp-url-12345.yourhost.com or 123.45.67.89/~username). Check your hosting welcome email or ask support: “What’s my temporary URL for testing before DNS changes?”
Before testing:
- Clear your browser cache completely (Ctrl+Shift+Delete on most browsers). Old cached versions make working sites appear broken.
- Clear your WordPress cache if using caching plugins (WP Super Cache, W3 Total Cache, etc.)
Test any of these areas that apply:
- Homepage loads correctly
- Internal links work
- Images display properly
- Forms submit successfully
- Login functions as expected
Look out for:
- View PHP error logs in cPanel under “Error Logs” or similar. Even if the site looks fine, errors here indicate problems that’ll surface later.
- Verify .htaccess rules copied correctly – broken permalinks are common. Try visiting a blog post directly; if it 404s but the homepage works, your .htaccess needs attention.
- Test email forms to ensure the notification emails still deliver to your inbox. Some website hosting providers handle email sending from your website, and some do not. If your hosting provider does not configure this for you, you’ll need to set up an SMTP plugin/service for your website. Mailgun offers a free tier.
If something worked on your old host but breaks on the new one, temporarily disable plugins one by one to isolate server configuration conflicts.
Phase 3: Go Live
Testing complete? Now it’s time to make the switch.
3a. Point Your Domain to the New Host
Update your domain’s DNS settings to point to the new host. This happens at your domain registrar (GoDaddy, Namecheap, or wherever you registered the domain).
Change your A record or nameservers to match the IP address your new host provides. DNS changes take 24–48 hours to propagate fully, though most users see the change within a few hours.
During this transition period, some visitors will see your old site while others see the new one. Keep both versions live until DNS fully propagates.
Just remember to remove the temporary URL lines from Step 2c now that your real domain points to the new host.
Minimizing Disruption During the Switch
- Migrate during low-traffic periods. Late night or early morning in your timezone means fewer visitors are affected during DNS propagation.
- Pause content updates during the 48-hour DNS window. New posts or changes might appear on one version but not the other, creating confusion.
- Set DNS Time to Live (TTL) to 300 seconds (5 minutes) an hour before migration. This can speed up DNS propagation, though some servers ignore it.
- Don’t cancel old hosting immediately. Wait until DNS fully propagates and you’ve confirmed everything works on the new host.
What to Watch For (and How to Fix It)
If something breaks after migration, try checking for these warnings or errors:
- “Error establishing database connection” → Check wp-config.php credentials (Step 2c)
- Missing images → Re-upload files that timed out (Step 2a)
- 404 errors on posts → Re-save permalinks in WordPress Settings
- White screen or 500 errors → Check file permissions (644 files, 755 folders)
- Outbound email not sending (contact form emails, website email notifications) → Check the email sending configuration on your new website host. Some offer sending email from the website, and some require a separate setup.
Most issues you run into trace back to incomplete file transfers or typos in configuration files. The smallest details tend to cause the biggest delays.
Ready for A Faster Website with Less Stress?
If you’d rather avoid any potential downtime, our website hosting & care plans include free migrations and expert troubleshooting. We handle everything so you can get back to the bigger picture.
We’re firm believers that moving to better hosting shouldn’t feel like a risk to your business. Let’s talk about getting your site onto hosting that supports your goals.
Frequently Asked Questions
How long does website migration take?
Simple sites can migrate in a few hours. Some visitors see your old site (about 10–30% by hour 6). Some see your new site (70–90% by hour 6). By hour 24, most users see the new version. By hour 48, virtually everyone sees the new version. Larger sites can take a full day.
- During migration: Your old site stays completely live. Visitors experience no disruption. You’re building a parallel version on the new host that nobody sees yet.
- During DNS propagation: DNS changes take 24–48 hours to fully spread across the internet.
Will my site go down during migration?
Not if done correctly. By keeping your old site live until DNS propagates, visitors continue accessing your site throughout the transfer.
What if something breaks after migration?
That’s why you made backups. You can restore to your old host if needed. Most issues are fixable within a few hours with proper troubleshooting.
Do I need technical skills to migrate my website?
Basic technical comfort helps, but you don’t need to be a developer. If you’re not confident with FTP, databases, and server settings, professional migration services prevent headaches.